In my honest and personal opinion, based on over a decade of experience with all kinds of holster systems, nothing beats a Safariland Duty holster.
Over the years, I have accumulated more holsters that I’ve lost count. That includes holsters for every type of carrying option.
For Duty holsters, I have always have either been issued or bought my own Duty holster made by the Safariland Group.
Safariland never stops with innovating their product lines and from running their holsters over the years, they only get lighter, stronger and provide a faster draw.
If you own a Glock, you’ll never have any problems finding accessories and holsters for your pistol. If you’re like me and tend to be a bit of an HK or Sig snob, you start to see that there aren’t as many options when you’re looking for accessories available. That’s the price you pay for preferring a different brand. Those that run Weapon Mounted Lights with something other than a Glock will find even less holster options.
Last year, I decided to switch duty weapons at work and I got myself a Heckler and Koch VP9 along with a Surefire X300U. At that time, Safariland had holster options available for the VP9 but not with the X300U. My VP9 was on hold until I had a Duty Holster to carry it in. I contacted Safariland Customer care and a few weeks later I was able to order it through the Tactical Pro Shop.
I’ve run my VP9+X300U holster over a year now and it’s still holding up the same as it was new. If you have my setup, here’s the information:
Model: 6365
Sku: 1183815
Part: 6365-5932-131
I’ll break that down for you; My holster is a level 3 retention holster, meaning it has the ALS (Auto Locking System) and the SLS (Self Locking System) together to give you the most secure level of retention. 6365 represents the low-ride belt loop attachment. It has the STX Black/Tactical finish and is for a Right Handed Shooter.
My holster before was a level 2 with just a SLS hood. Having both, the level 3 is a much faster draw than the level 2. Believe it or not, my current holster is more secure and smoother of a draw than my previous holster.
Another new feature, which I like a lot, is that the holster will hold and secure your pistol with or without the weapon light. This is made possible with a barrel plug at the bottom. My previous level 2 holster will not secure the pistol without the weapon light attached.
The retention systems in place are intuitive and natural to deactivate the locks. With that, you still need to practice your draw many times over to build that muscle memory. Anytime I change any part of my kit, I usually at the minimum practice my draw hundreds, if not thousands of times.
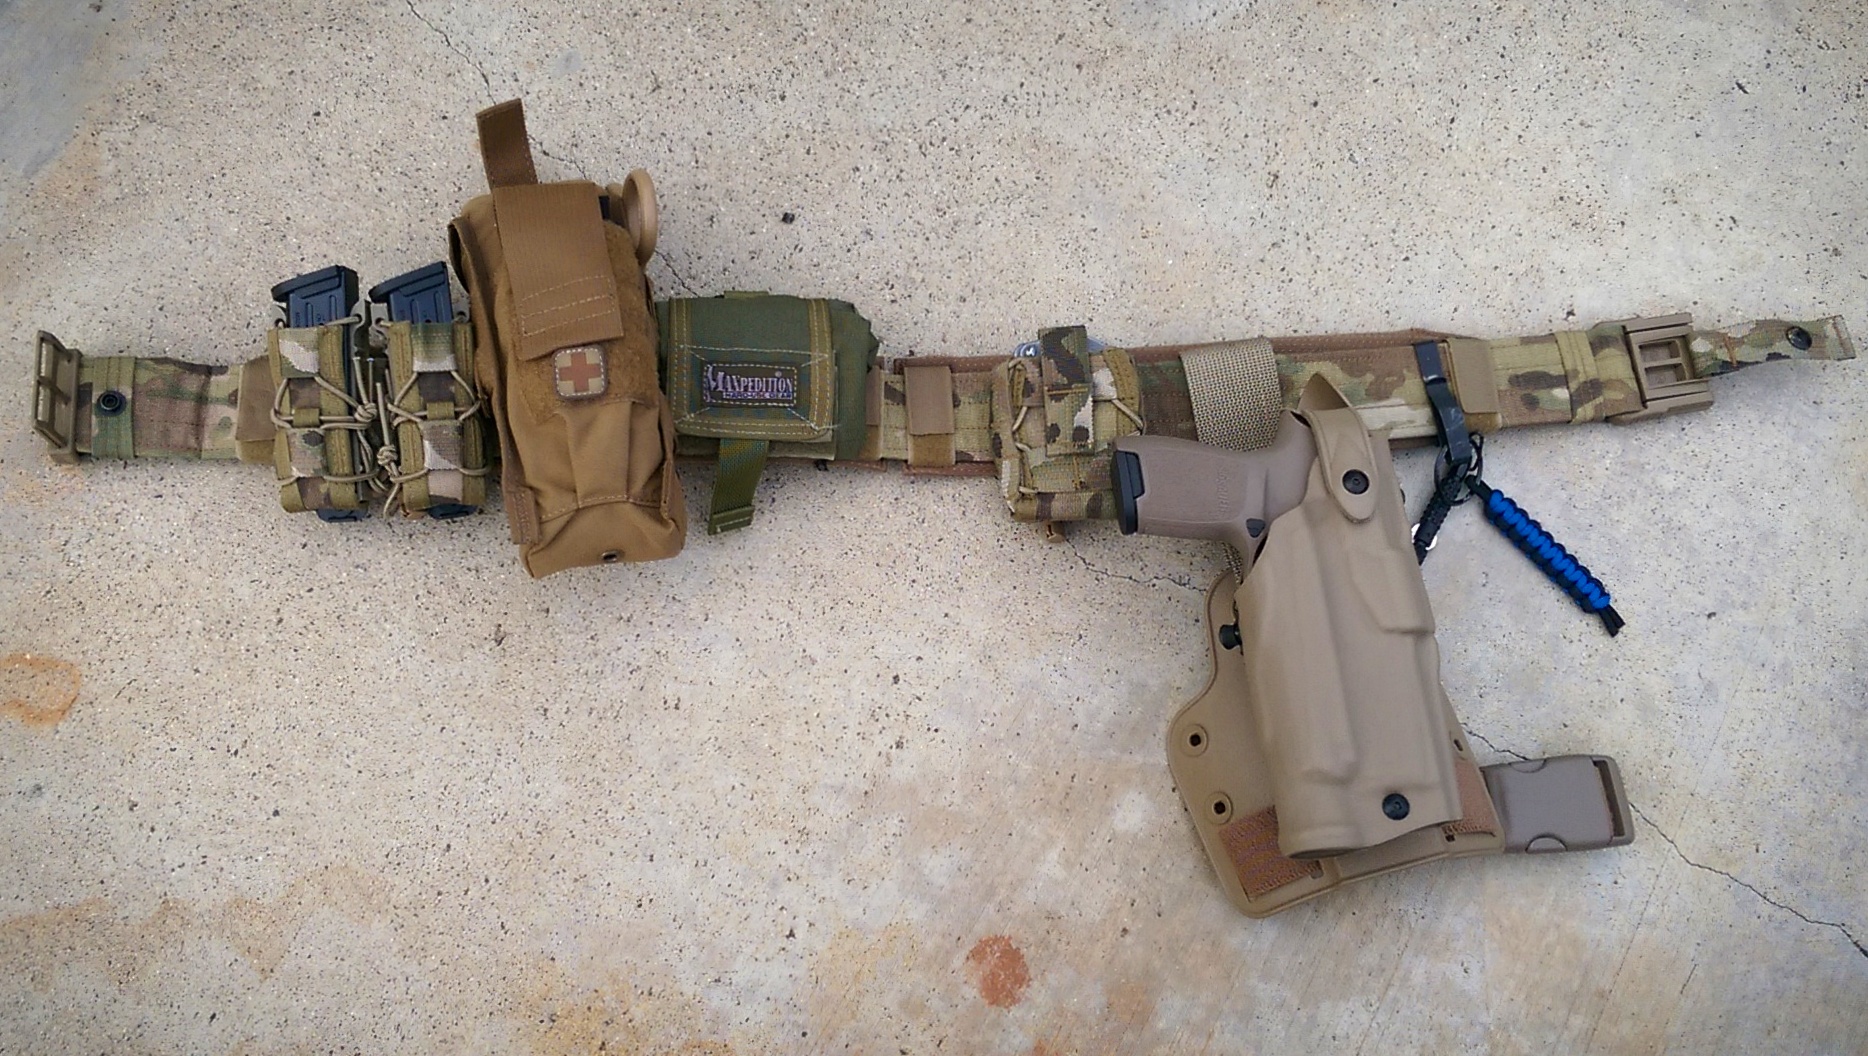
My Duty Holster setup was made into a modular custom rig. I utilized the QLS system along with a 6004 drop leg shroud. I removed the top leg strap and moved the entire shroud up as high as possible to increase stability and assist with weapon retention from a gun grab.
Over the last few months, I purchased a Sig Sauer P320C FDE. Like my VP9, I run an X300U on my P320C. I wanted my holster to be in FDE to match my P320C and my kit. Safariland made my holster customized to my specifications. I unofficially call it the Fifty Shades of FDE Edition holster. Here is the information on my custom holster:
Model: 6365
Sku: 1191091
Part #: 6365-7502-551
It is the exact same holster as my VP9+X300U. Except it’s for my P320C+X300U and has an FDE finish.
I have the QLS system on all of my holsters therefore I can run any weapon system I choose very easily and quickly.
There are numerous custom holster makers out there that make high quality custom holsters that are usually kydex for concealed carry. Some of them are already making duty holsters, some with Safariland SLS level 2 hoods.
Although they may be great holsters, a level 2 is the highest level of retention you can get from those makers. The ALS system is something that only Safariland has available, giving you either a level 1 retention by itself or level 3 when combined with the SLS hood. Safariland has it down to a science and they will do their best to come up with a holster solution for you if they don’t already have one available.
To find a holster solution, click at the link below and use their holster finder:
http://www.safariland.com/holster-finder?step=guntype
I get asked a lot of questions about my Battle Belt. I figured it was long overdue for a review. The base and heart of the Battle Belt is the Belt itself.
As you all know, I do an incredible amount of research prior to purchasing any gear. What I wanted was a low-profile, light belt that would be quick to put on and strong enough to secure the equipment necessary to run a pistol system without moving all over the place.
It is made by EmdomUSA and it is called the CM Belt. Here is their description:
“The Emdom/MM CM Belt is a design collaboration between Emdom USA and MM from www.militarymorons.com. “CM” stands for “Cingulum Militare” which is Latin for the military belt that the warriors of ancient Rome hung their swords and daggers from. It is designed as a low profile, light weight, and rigid duty belt. It can be used alone or in conjunction with a MOLLE war/battle belt. The CM Belt supplements our Emdom/MM Battle Suspenders as a purpose driven load carriage system. The CM Belt is compatible with pouches and holsters designed for 2” wide belts and/or MOLLE/PALS platforms.”
I got my CM belt in Medium, Multicam along with a set of pads in Coyote Tan. The pads help add comfort as well as stability in the setup. With the pads attached, the entire belt stays put no matter what activities I’m involved with.
So what’s the purpose of my Battle Belt? It’s my go to quick reaction kit, that once on, will carry two extra magazines, a medical kit, and holster for my pistol.
I’ve made my Battle Belt Modular as well as my Plate Carrier. What does it mean to be Modular? My kit will accommodate all of my weapons systems that are in my inventory. I will write about my plate carrier later.
In order for my Battle Belt to be modular, it has to accept any pistol holster and magazines to support that system. For holsters, I employ Safariland duty holsters with QLS kits (Quick Attachment Holster System) to go with a single-strap drop leg shroud. This makes attaching/detaching the holsters a breeze. In order to accommodate different sized magazines, I have two High Speed Gear or HSGI pistol taco pouches. I also have a HSGI handcuff case.
No matter what pistol I choose to run, all I have to do is swap out holsters and magazines. Everything else is in the same place so there is consistency with my belt system.
I’ve practiced with the CM Belt and have run it hard in some classes. It seems to stay put and be comfortable to wear a day long. The ITW snap dragon belt buckle is strong, light and is sturdy. It won’t be coming undone by accident. To disengage, you need to take the pull tab and pull away from your body.
For my IFAK medical kit, I run the DARK Angel Medical Gen3 D.A.R.K. kit. It has a SOF-T Tourniquet in the front pouch and everything else you need in the main pouch that is vacuum sealed with trauma shears on the side. Since firearms will be involved, whether it’s training or a real life event, you better be prepared for someone (hopefully not yourself) to be hit by gunfire!
I’ve been running the CM Belt as my Battle Belt for a few years and I couldn’t be more satisfied. If you want to get it with the pads, make sure you order a size up!
Links:
To order a CM Belt:
http://www.emdomusa.com/Emdom-MM-CM-Belt-p/eu116.htm
There’s a ton of options when it comes to custom kydex holsters. The hard part is finding the right fit for your needs because everyone has their own body shape and lifestyle. Johnny, the lead instructor over at Iron Works Tactical says it best, “Everyone is their own unique snowflake.”
I recently attended the Iron Works Tactical EDC class and used some brand new kit made specifically for me by Mark, of Thomas Tactical Precision (@thomas_tactical_precision on Instagram)
I was invited to the class about three weeks prior by my friend Jeff, who asked me what I was going to run and what kit I was running (Glock 43). A few days later, he told me to ship one of my spare magazines over to Mark so he could work on some kit for me.
TTP is a one-man operation and Mark has a full-time job so with the short notice, he had to scramble to get the holsters out to me. He worked closely with Brett from Iron Works Tactical on this project for me. Brett had some ideas that he thought would make it a better holster with his extensive experience in this field. After four different designs, Mark finally got the finished product just a day or two before the class. He hand delivered the fresh new holsters to me at the range just prior to the class starting.
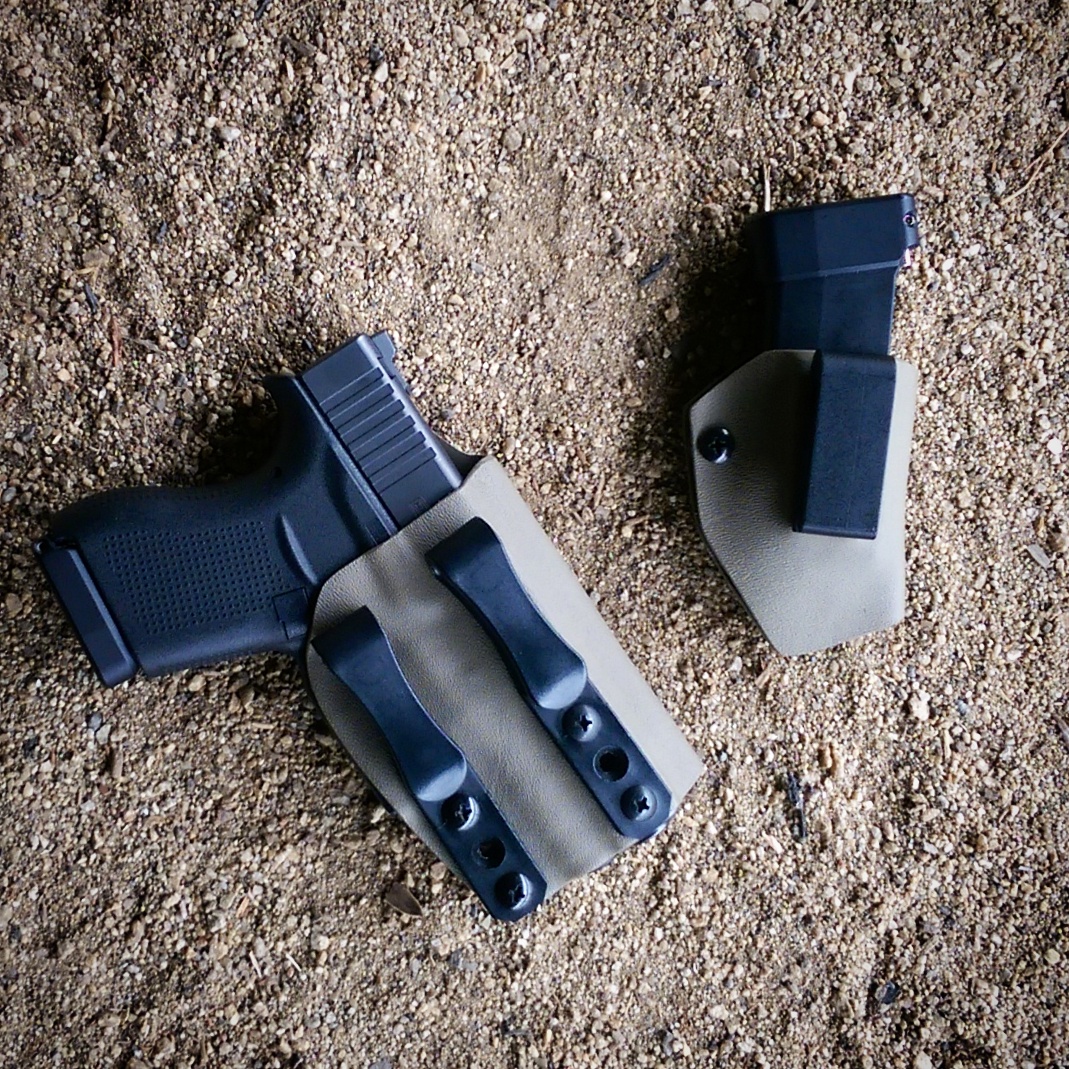
What I got was an Appendix In the Waistband (AIWB) holster and IWB magazine holder for my Glock 43, both in my favorite color, FDE.
I was running an AIWB holster made by Hickory Tree Holsters ever since I got my G43. It was a simple, single clip design and worked fine. It however would move and with my very active lifestyle, I found myself having to adjust and readjust the holster so it wouldn’t print, a bad thing to be doing as it is a dead giveaway to anyone watching.
The TTP AIWB holster was a lot different from my previous in appearance and in feel. The first noticeable feature was that it had two thin clips instead one. They are parallel but a bit off set. I requested a full sweat guard and Mark suggested that I get mole skin attached to add comfort. There are two retention adjustment screws at the bottom of the holster. I’ve never had an IWB magazine holder before, but I’m glad I had one for the class and it’s something that I’ll always have on me. I used to carry my magazines in my support side pocket. In the pocket, they’re not as easy to retrieve as you’d think in practice.
I put the holsters on and immediately I could tell and feel the difference in the AIWB, it was much more secure and stayed put, close to my body. The IWB took a little to get used to but once I found the right placement, it was good to go.
Once we started drawing from our concealed holsters and shooting, I noticed how much of a difference it made to have the stability in your holster. I always knew where my G43’s position was, and since drawing from concealment takes a few more steps than it would from an open holster, anything to assist in speeding up the process could make all the difference. It never moved from the time I drew and shot my G43, so when it came time to re-holster, there wasn’t any guessing as to where it is.
The IWB magazine holder definitely speeds up the reloading process by being in a stable position, also with it being on my support side, I’m used to having my magazines there on my duty setup and all of my pistol setups for that matter. Muscle memory makes drawing my magazine from the IWB holder something I just instinctively do without having to think.
On one of the shoot, reload moving drills, it required two separate reloads and I found it very difficult to find the second magazine that was in my pocket to initiate the final reload.
Mark wasn’t able to attend the class due to work so I didn’t get to talk to him about it during the day. Brett came over during a break and asked how the holster was working for me. I told him that it was working out great and that was when I learned that he was involved in the design of this holster. He always suggests that a good IWB holster should have two clips for all the reasons stated above.
Knowing that Mark collaborated with Brett (a full-time LEO with years of experience and extensive training in this field) tells me that he cares about the quality and function of his products.
The TTP kit is now my Every Day Carry kit. It is light weight, high quality and finished with no sharp edges. Mark is someone who will work with you to make the right solution for your custom kydex holster needs.
You can see his work on his Instagram page @thomas_tactical_precision you can contact him via email: [email protected]
If you want to read my AAR on Iron Works Tactical EDC Class:
I was invited by my best friend Jeff @muzzleflashmedia to attend a shooting class that really sparked my interest, an Every Day Carry class from Iron Works Tactical. I completed the one day class on Saturday and I’m very glad that I did. Here’s my After Action Review below.
I’ll start off with a question: when was the last time you took a class that involved you carrying your EDC pistol as you would in reality (concealed) and run it from that position?
For me, with 8 years in my Law Enforcement career, this was the very first class of it’s kind that I’ve taken. And No, this isn’t your CCW class where you get a certificate for your CCW permit or get legal knowledge on carrying etc. It was geared for the students to learn how to run their guns from their concealment setups safely, validate their equipment and work on their marksmanship-because EVERY round you fire counts!
Iron Works Tactical is owned and operated by Brett, a Full-time LEO and veteran, who is known for building precision AR’s. He runs IWT along with his instructors, who are also Full-time LEO’s, on their few days off that they have. They run training classes to help the shooting community improve their knowledge and skills. The lead instructor for this class was Johnny (@rattlesnake44 on instagram), I’ve known Johnny on Instagram over the years and I finally got to meet him in person at the class. He too, works with the same agency Brett does, and is also a veteran. Johnny really wanted to teach an Every Day Carry class for some time and this was the first class of it’s kind offered by IWT.
We started out at 0800 and there were 9 students total including myself. 6 were civilians, some had CCW permits, some were planning on getting one and 3 were full-time LEO’s myself included. Everyone had varying experience at shooting, none of us were beginners. At the beginning, Brett and Johnny went over their background, experience and went over their concealment setups and the reason for each piece of their kit. Then they had every student do the same so that we all could see all of the different ways people ran their kit. It was interesting to see all of the different setups, everyone is their own “special unique little snowflake” according to Johnny. What works for one may not work for someone else. Everyone did a great job not printing from the get-go.
What I ran for my kit: my pistol is my back-up gun at work and my EDC, the tiny Glock 43. All of my magazines have Taran Tactical Innovations base plates (1 plus one and 3 plus twos) I ran it in an Appendix In the Waist Band (AIWB) custom kydex holster made by @thomas_tactical_precision with input from Brett. I also ran for the first time, an IWB magazine holder, also made by TTP. TTP made this kit for me to run through this class specifically and he made sure that it was all in FDE. I will do a separate review soon on the TTP kydex gear. The belt is a very important part of your kit, my belt was made by @vagabondstitchingco. I have their regular guy 1.5″ belt with a cobra belt buckle in coyote Tan and I’ve been using it everyday for over three years. I conceal everything with a T-shirt.
After the show and tell, Johnny made us do some stretches and short PT to see if any of us printed, had to adjust our kit and if we could comfortably perform these movements, because you don’t simply stand still when you are carrying concealed.
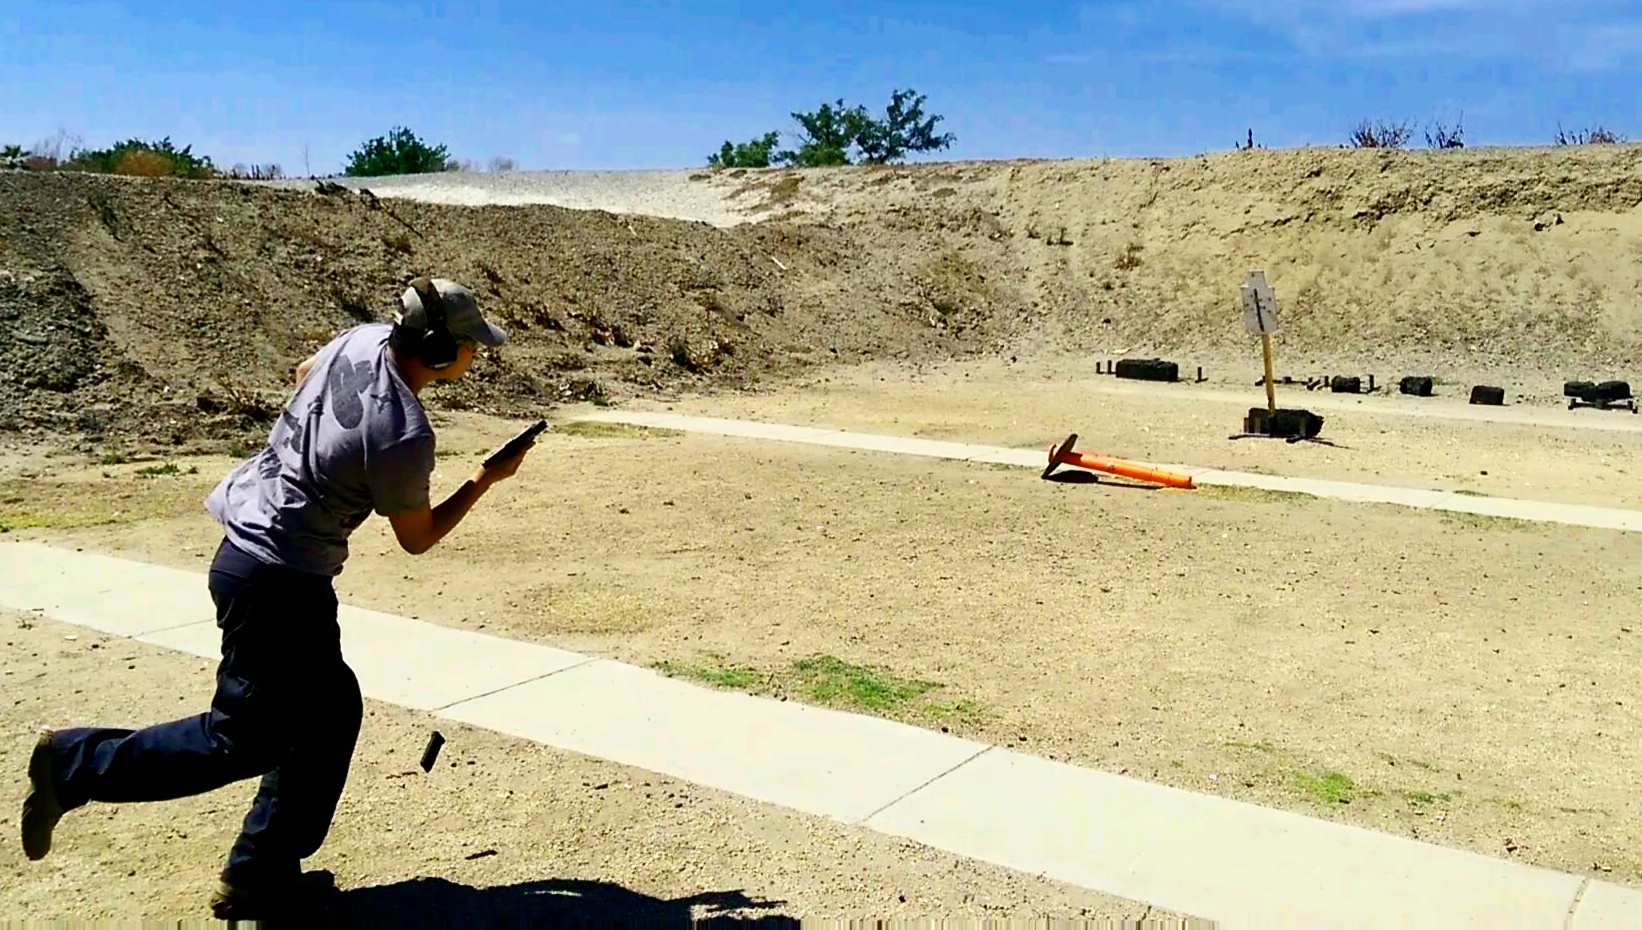
Now that we were all limbered up, we started sending rounds downrange. Johnny made sure we had all the opportunities available to practice our draw from our concealed holsters under clothing. I’ll be very honest, my Glock 43 isn’t my favorite pistol to shoot. It’s pretty common for little guns to be undesirable to shoot, they recoil a lot more than bigger pistols and after a large round count, it starts to get uncomfortable. Before this class, I’ve shot maybe a couple hundred rounds total through it and all slow fire, at 22 feet on a static range. It isn’t my favorite gun to shoot, so why is it my EDC? It is because concealment is my top priority when I carry and with my body type and lifestyle, which is very active, this is my best solution.
We started with the keyhole drill to work on marksmanship. 3 rounds with no time limit; at 3, 5, 7, 15 yards. I was shooting low and left, which took some time for me to fix with instructions from Brett and Johnny. My grip and trigger finger placement needed to adjust, since the G43 is a slim, single stack pistol and all of my shooting revolves around double stacked pistols.
Johnny’s method of teaching was to have us crawl, walk then run.
During the keyhole drill, we all got comfortable with clearing our clothing with both our support and gun hands, and firing from the concealed position (not from behind a bush, but from a concealed carry draw).
Next we shot with an object in our primary gun hand, yes gun hand, if you’re a LEO, you’re trained to never have anything in your gun hand. That makes total sense when you’re open carrying in a duty holster, but in a conceal carry situation, your support hand has a very important job, to move your clothing out of the way in order for your gun hand to grip the weapon. So when you’re carrying concealed, holding things in you gun hand is totally reasonable. So we practiced holding a empty ammo box to mimic a smart phone in our gun hand and having to shoot from there. In order to accomplish this, all you have to do is simply let go of the object and start your draw. After we got acclimated to multitasking with an object in our gun hand. We switched it over to having the object in your support hand. This makes things a bit more difficult, now you have to clear your clothing with your gun hand before you draw. This took more time and coordination. I noticed that my shot placement was the worst during these drills. Adding an extra step most likely subconsciously made me want to speed up to make the shot and miss some fundamentals. One thing I learned to do in this was class was to slow down and make my shots count.
Aim small, miss small. You’ve all heard that before and it proved to be true. Johnny handed out 3×5 flash cards and had us staple them to our targets. We drew and fired a single shot from varying distances out to 25 yards. I started to take my time and took all the instructions that were given to me and applied them and I could see that most of my shots landed on or very close to the 3×5 card.
Gear validation was a very important part of this class and I had absolutely no issue with my TTP kydex. Others weren’t so fortunate, we saw some holsters flying during draws, magazine holders falling apart. This was the moment of truth for us to run our gear very realistically. This includes our weapon that we carried. Not surprisingly, those who ran compact and full-sized pistols shot much more accurately than those of us with pocket pistols. I’ll get into this part later on.
With the basics down, we got into moving and shooting. First we did a random target drill while walking forward. We did this one at a time and while walking towards the target, we would be assigned a random target and would draw and fire two shots at the threat.
Then out came the steel targets. We were run through moving and shooting at multiple targets, using angles and then incorporating reloads. Drills that involve shooting at steel targets are usually my favorite parts of any shooting class. I started to shoot faster than I could do so accurately and had some misses. I was told to slow down after a miss, going against what you want to do, hurry up and make a hit. Speeding things up isn’t going to help you make the next shot, instead it was explained that slowing down will allow you to fix whatever caused you to miss in the first place and make the next shot count, rather than miss faster.
We were reminded that every round we fire counts and has the potential to go for very long distances, and in a real life scenario, there’s to berm to stop your bullet.
The view from 50 yards
We finished up where we started, we worked up on marksmanship, back to the keyhole drill, with a 3×5 flash card and pushed it out to fifty yards. That’s asking a lot from a pocket pistol! Jeff placed a high end video camera behind my target and it wasn’t harmed during the making of the video.
Once the shooting was over, we did an After Action Review with all of the students. Everyone got to talk about what they liked and what needed improvement. All of the students enjoyed the class and took away a lot from it. For improvements, some wanted a higher round count and more scenario training. My suggestion was that this class would be a great beginner EDC class and there should be a follow up class that includes everything that some of the students requested. Johnny took everything we had to say down and since this was the very first EDC that IWT has hosted, he already had similar ideas as he was teaching us throughout the day. This class maybe called EDC1 in the future and there maybe a new class growing from this one.
I made a lot of observations and take aways during the course of the day and so did every student in attendance. All of us were able to validate our kit by actually putting it up to the task for which it was meant for. All of my kit worked out for me, while some kit failed for some of the other students.
All three LEO’s, myself included ran the Glock 43 as our weapon system and at the beginning of the class, we all shot low and left of center. We gradually improved after every drill with advice from Brett and Johnny. We all learned real quickly that we were handicapped by the platform. This was why I was very eager to take this exact class- to run it and improve my skill with this system because it is the best concealable platform for me. My Glock 43 is bone stock with the exception of the Vickers Tactical sights. If you’ve ever shot a Glock 43, you’ll know right away that the trigger is heavier than a standard Glock and the recoil is a bit more snappy. The recoil was a given due to it’s size and weight. Due to my agency’s policy, I can’t do anything with the trigger. I just have to train with what I’ve got. I did get to try one of the other LEO’s Glock 43 that had an OC Custom Glock Trigger that is stock, but polished and it was a huge improvement over my stock trigger. By the end of the class, I was able to get used to my G43 and I actually enjoy shooting it a lot more than I had coming into the class. The other LEO started with his Glock 43 and wasn’t a fan so he switched over to his Smith and Wesson M&P Shield after lunch and did a little better; at the end of the class he mentioned that he was planning on getting a similar M&P9C that Johnny was running as his EDC.
My agency doesn’t train us for Every Day Carry the way this class did. I’m not personally aware of any local Police or Sheriff’s Department in my area that does this type of training. You can practice your draw, reloads and dry fire from home but you probably can’t do live fire practice from your concealment at your local public or even agency’s range. So how are you really going to get some real practice in? It’s by going to classes like this.
I’m always a proponent of firearms training for every law abiding citizen and LEO because there’s no such thing as too much training. Everything you take away from the classes you attend will go into your tool box and whether you end up using that tool or not, you’ll always have the knowledge and training available.
Since my time is very scarce and so is everyone else’s, with all of the available firearms instructors out there. You definitely want to make sure that they have the experience and qualifications to make the most of your time on the range. Both Brett and Johnny are more than qualified for this task and they know how to convey it in a way for you to understand what they mean. This was a class that I needed to take for years and in my opinion, every single person who carries a concealed firearm whether it be a LEO or CCW permit holder should take.
To learn more about Iron Works Tactical, check out their website:
http://www.ironworkstactical.net/
Very special thanks to Jeff for inviting me to attend. Brett and Johnny for teaching me how to run my EDC efficiently and accurately. Mark @thomas_tactical_precision for making all of the custom kydex gear in short notice for me!


